Raspberry Pi is an embedded system that can perform an abundance of tasks ranging from making spreadsheets, listening to music to interacting with the outside world. Gaining emergence as the best-selling British computer, it is known for its extensive usage in robotics, and affordability. Moreover, being able to configure it for a wide range of purposes makes it a refreshing change from existing PCs in the market. However, customising it into a device or gadget requires some programming and configuration. But, with the present generation of tech-oriented children developing problem-solving skills through coding, it has retained its status as the best single-board computer among students, as well.
Using Raspberry Pi as a Single-Board Computer
It has all the parts of a computer; also, it operates like a computer by plugging in peripheral devices such as a monitor, keyboard, and mouse. The monitor needs an HDMI port, and with just a power supply, you are ready to use your single-board computer. The latest version of Raspberry Pi 4 has three RAM options (2GB, 4GB, and 8GB.) With each model having an in-built RAM chip.
It has a GPU chip as well that is useful in 3-D applications. A GPU’s function does not just pertain to gaming. Without a GPU, you wouldn’t be able to code for machine learning, engage in video processing, or edit images. Raspberry Pi can accomplish all of these tasks with ease. But, these are only a few aspects of what the real processing power of this mini-computer can do.
What Can Raspberry Pi Do?
Raspberry Pi is a useful tool in teaching programming to children of all ages. But, the widespread uses of this powerhouse make it a convenient device for technical professionals as well. Raspberry Pi is a multi-faceted device that can be suitable for applications such as weather reporting, home automation, obstacle-avoiding robots, and much more.
It is, frequently, used as a gaming console and customizable as a high-quality camera which is much superior to standard webcams. As a gaming console, it can play retro-games, and if you feel up to some coding in your spare time, then, your Raspberry Pi could be on par with other gaming consoles. It can also, emulate PSP, Saturn, and PS2, as well as other favourites. It can store hundreds of games while being compatible with most of the available game titles in the market. With the option of putting an Ethernet cable, it can also, allow you to connect many computers across a wired network interface, thus acting as a wired or wireless router.
Raspberry Pi in a Smart Home
All you need is savvy for technology and problem-solving to use a Raspberry Pi. Yet, this machine works efficiently as an IoT device too. Using this single-board computer as an IoT device means that connecting it to the internet enables it to serve other purposes such as home automation. However, Raspberry Pi has far more robust programming and machine learning capacity than most IoT devices, making your home smarter.
In a smart home where lighting fixtures, thermostats, home security systems, cameras, and sensors need coordination through machine learning, a Raspberry Pi system can come in very handy. It can undertake all of these functions with little to no error in execution, which is what is meant by the term “robust.”
Previous Models of Raspberry Pi
The actual purpose of the Raspberry Pi computer was to introduce a low-cost and programmable computer. In the beginning, a Raspberry Pi kit had all the required ancillary devices and the famed Raspberry Pi as the piece-de-resistance. The idea was to get users back to computing basics using a programmable computer. When the first starter kit launched, its target users were kids who wanted a hands-on experience with learning the intricacies of using a computer. Intriguingly, the Raspberry Pi increased in sales, exponentially, due to its usage in robotics. Here are the models of Raspberry Pi to show how the new version is different from its predecessors:
Model A+: Released in 2012 the low-cost variant of the Raspberry Pi had 512 MB of RAM.
Model B+: this model first introduced the Ethernet port and was released in 2014.
Raspberry Pi 2 Model B: the second generation of Raspberry Pi superseded the Model B+ in 2015.
Raspberry Pi 3 Model B: launched in 2016, in its cheapest form, it doesn’t have a case. Although, it was still recognizably credit-card sized.
Raspberry Pi 3 Model B+: launched in 2018 with a gigabit Ethernet port, used in most enterprise networks.
Raspberry Pi 4 Model B: launched in June 2019, the 2GB RAM variant superseded the original 1 GB RAM variant. You can purchase the former via order. This Raspberry Pi is the latest model.
Raspberry Pi Zero and Pi Zero W/WH: this embedded system is half the size of the Model A+. Yet, it is a popular model as well.
Articles You May Read
This article aims at using the Dropbox SDK for python on Raspberry. This generation prefers to keep all the data handy DVDs, pen drive, Bluetooth is old fashion. Everyone is moving to cloud storage whether it is an individual or organisation, then why should our devices depend on physical memory? We can store any datalog, images, videos or any other data directly to the cloud.
In this article, we’ll upload and download a file to and from Dropbox using python on Raspberry Pi. You can follow these steps on any other devices like windows, mac, or Linux.
Things You Need
- Raspberry Pi 4
- Working Internet Connection
- Dropbox account
The Initial Setup
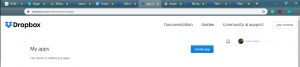
Open Dropbox Account:
- Sign In or Sign up into https://www.dropbox.com/
- Go App Console https://www.dropbox.com/developers/apps, and click on ‘Create App’
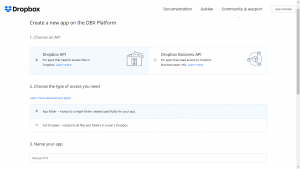
- Select the Dropbox API, type of access you need, and name of your app. My app name is ‘MyApp1010’. Hit ‘Create App’ when done
- You will be redirected to your apps settings. Click on Generate Access Token.
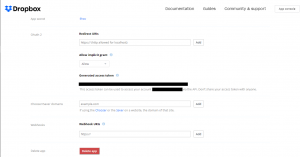
- Copy the generated token to a text file. In my case, this file’s name is key.txt.
Also check new Micro bit Collections (Stem Bit – The Programmable blocks kit for micro:bit)
Raspberry Pi Setup:
- Power up the Raspberry Pi and get access to the Desktop or Terminal.
- Connect the Raspberry Pi with an internet connection.
- Via ‘Terminal’ install Dropbox python SDK using pip as-
pip3 install dropbox
Follow these instructions: https://www.dropbox.com/developers/documentation/python?_tk=pilot_lp&_ad=sdk6&_camp=python#install
Code
After the Dropbox account is set and Raspberry Pi is ready with the Dropbox module installed.
Create a file with the name of your choice. Import the Dropbox module-
import Dropbox
Create an instance of the Dropbox object. To instantiate, pass in the access token for the account you want to link-
dbx = dropbox.Dropbox(‘YOUR_ACCESS_TOKEN’)
Or
Read the key from text file. You can also encrypt the key for more security.
with open(“key.txt”) as key:
k = key.readline()
Access_Token = k.split()[0]
# instance of the Dropbox object
dbx = dropbox.Dropbox(Access
_Token)
To check the account you have connected to use users_get_current_account() function:
dbx.users_get_current_account()
It will return the app metadata.
The following code lists the directories, Upload a file to your Dropbox account associated app, downloads a file, and creates a folder on Dropbox directory.
import dropbox
# key extraction
with open(“key.txt”) as key:
k = key.readline()
Access_Token = k.split()[0]
# instance of the Dropbox object
dbx = dropbox.Dropbox(Access_Token)
if __name__ == “__main__”:
# Test it out to make sure you’ve linked the right account
dbx.users_get_current_account()
# List all of the contents in the directory
# use ” for user’s root Dir
dirName = “/MyDir”
for entry in dbx.files_list_folder(dirName).entries:
print(entry.name)
# Upload a file
# filename = ‘TempFile.txt’
dropbox_Path = ‘/’ + filename
with open(filename, ‘rb’) as file:
# Dropbox Write modes
# files.WriteMode.add
# files.WriteMode.overwrite
# files.WriteMode.update
file_ = file.read()
FileMetadata = dbx.files_upload(file_, path=dropbox_Path,
mode=dropbox.files.WriteMode.overwrite,
autorename=True)
print(FileMetadata)
# Create Folder
dir_Path = ‘/NewFolder’
dir_Metadata = dbx.files_create_folder(dir_Path, autorename=True)
print(dir_Metadata)
# Download File
download_Path = “home/pi/Downloads”
dropbox_Path = ‘/TempFile.txt’
Metadata = dbx.files_download_to_file(download_Path, dropbox_Path)
print(Metadata)
You can use different methods to use and control your Dropbox account. Add any sensor logs, Images or videos to your Dropbox account via a python script.
Follow the dropbox for python documentation for accessing more features of dropbox module from your python module: https://dropbox-sdk-python.readthedocs.io/en/latest/index.html
Conclusion
You can also use APIs provided by dropbox, the steps to configure that may vary but it will be fun. This module provided by dropbox has everything you will need to manage and control your Dropbox account. This module is made for integrating your apps directly to dropbox. Enjoy using cloud storage on your Raspberry Pi log sensor data from the Raspberry Pi or create your own spy box which synchronizes everything to your dropbox.

SCRATCH 3 IN RASPBERRY PI
Introduction
Scratch is a block-based free education language developed by the Massachusetts Institute of Technology ( MIT) in 2003 and was first released in 2007 publicly. It is easy to go visual programming language targeted especially for students. You can create your project by dragging the programming blocks from the block palette and attaching them with the other blocks according to your program. This type of programming is called “drag and drop programming” and the structure of multiple blocks are called scripts. Scratch allows children to create interactive projects and learn to program.
Many schools even added Scratch in their school curriculum and not only in schools but the scratch is also used in colleges, after school centres and many code clubs. Scratch was developed for educational purpose, to create fun projects and is easy to learn a language. We can create interactive stories, poems, games, projects and many more. Scratch also has a special section for teachers. Till date scratch have 40 million active users and over 40 million projects.
The latest version of scratch is Scratch 3.0 which is released in 2019. You can download it from the Scratch site and even download the older version. Scratch also has an Offline editor on the same site.
SCRATCH 3.0
Scratch 3.0 is the latest version by MIT on January 2, 2019. The new Scratch 3.0 version has some major changes and a completely new look feel. The new design is more soft and modern.
The interface consists of 3 major sections: block palette, stage area and a space for coding and all the programming block arrangements. In the project, all the actions and movements are done by an object called the Sprites, which can be chosen from the sprite library, uploaded or can be user-created. All the actions of the sprites are performed on the stage and you can also use more than one Sprite. The stage area is the place where the results displays(i.e, animations, games, stories, etc) and you can also resize the stage size. All the Sprites thumbnails are listed below the stage. The stage follows the x,y coordinates and at the centre of the stage is the 0,0 coordinate. In the stage you can change the background of the sprites by changing the backdrops. You can select the backdrop from the backdrop section, upload from the system and also can draw it.
On the left-hand side is the block palette, from where you can drag your required block. And if you need more blocks you can also add it from the extensions. Raspberry Pi has its own extensions for its GPIO pins, HATs, etc. Raspberry Pi (Buy Raspberry Pi 4 Clear Cases) comes with preinstalled Scratch and Scratch 2. Once you have selected the block then drag it to the coding area which is in the middle section. You can code the sprite one by one. Scratch also has a Costumes tab which allows the user to change the appearance of the sprite and to give more effects and animations.
MAJOR CHANGES IN SCRATCH 3.0
- The size of the blocks is enlarged slightly.
- Block order is different now.
- The text of the blocks is also different.
- The shades of some blocks are also changed.
- More Blocks is renamed to My Blocks and is given light red colour.
- Paint editor and sound editors are added.
- PicoBoard and LEGO WeDo 1.0 are not supported anymore.
- New extensions are added i.e. Pen, Video Sensing, Music blocks, text to speech, translate, micro:bit and Lego Mindstorms EV3.
- Internet Explorer and other out-dated browsers are removed.
- The position of the stage and block palette are different now.
- Sprite position can be changed by changing the position coordinates.
- You can rename the Sprites names and also can be rotated.
- New sprites and backdrops are introduced.
- Vector paint editor is the new default editor.
- Different fonts are also introduced i.e. Sans Serif, Serif, Handwriting, Marker, Curly, Pixel, Chinese, Japanese and Korean.
- Tutorial Section and project search are also added.
- Now we can choose from dozens of new sounds, characters and backdrops.
RASPBERRY PI AND SCRATCH 3.0
The new Scratch 3 requires at least 1 GB RAM to run. If you are using Raspberry Pi 4 use at least Pi of 2GB RAM. Scratch 3 can run on Raspberry Pi 2, 3, 3B+ with 1 GB RAM, performance may vary according to the lack of memory.
HOW TO INSTALL SCRATCH 3.0 ON RASPBIAN BUSTER
First, start with updating and upgrading the Raspbian.
Type the following commands in the terminal to update Buster and install Scratch:
sudo apt-get update
sudo apt-get install scratch3
INSTALLING SCRATCH 3.0 USING RECOMMENDED SOFTWARE APP
Go to the menu or the raspberry icon on the left corner of the desktop, click on Preferences > Recommended Software, and choose Scratch 3 and click on the OK. It will take some time to download. After the download completes find the Scratch 3 in the Programming section.
RASPBERRY PI EXTENSIONS
GPIO EXTENSIONS
This extension gives you access to connect and control the GPIO pins of your Pi with your
Other devices.
SIMPLE ELECTRONIC EXTENSION
These are the beginner-friendly extension. Simple electronic device blocks are there like LED, BUTTONS, etc. These devices are used for making simple as well as major projects.
SENSE HAT EXTENSION
HAT extension is updated and a number of new features are introduced:
- For displaying characters, numbers and patterns on the LEDs.
- For measuring pressure, humidity and temperature.
- For sensing movements.
- Use the joystick.
SB Components wrote up an entire project SCRATCH 3 in RASPBERRY PI. Go forth and enjoy it!
Please visit our site for more : https://shop.sb-components.co.uk/